fuel
In the previous article you learned about the basics of Fuel CMS: how to create views and simple pages. Most websites these days are not that simple though, they have a blog, a gallery, etc. In this part, I’ll explain how Fuel CMS modules work and create a basic guestbook module to demonstrate.
在上一篇文章中,您了解了Fuel CMS的基礎知識:如何建立視圖和簡單頁面。 如今,大多數網站并不是那麼簡單,它們都有部落格,畫廊等。在這一部分中,我将解釋Fuel CMS子產品如何工作并建立一個基本的留言簿子產品進行示範。
什麼是子產品? (What are Modules?)
Most of Fuel CMS’s functionality is packaged into modules. A Fuel CMS module contains at least one model with an accompanying database table and can be extend with controllers and views.
Fuel CMS的大多數功能都打包在子產品中。 Fuel CMS子產品包含至少一個帶有随附資料庫表的模型,并且可以使用控制器和視圖進行擴充。
In the MVC pattern, models are classes that define different data fields and are used for working with the data stored in tables. For more information about models in CodeIgniter (the framework which Fuel CMS is written in), see the framework’s documentation.
在MVC模式中,模型是定義不同資料字段的類,用于處理表中存儲的資料。 有關CodeIgniter(編寫Fuel CMS的架構)中的模型的更多資訊,請參見架構的文檔 。
In a default Fuel CMS installation, standard modules are included by default. For example, the blog system is built up from three modules: Posts, Categories, and Authors. Each of these modules has its own table in your database. In this article we’ll be creating our own guestbook module. Everyone can post new comments and an administrator can moderate them through the administration menu.
在預設的Fuel CMS安裝中,預設情況下包括标準子產品。 例如,部落格系統由三個子產品構成:文章,類别和作者。 這些子產品中的每個子產品在資料庫中都有其自己的表。 在本文中,我們将建立自己的留言簿子產品。 每個人都可以釋出新評論,管理者可以通過管理菜單來對其進行稽核。
編寫模型 (Writing the Model)
Start with creating the directory
modules/guestbook
. From now on, I will refer to this directory as the “guestbook folder”.
首先建立目錄
modules/guestbook
。 從現在開始,我将這個目錄稱為“來賓檔案夾”。
To register the module, open
application/config/MY_fuel_modules.php
and add the following line to:
要注冊該子產品,請打開
application/config/MY_fuel_modules.php
并将以下行添加到:
<?php
$config['modules']['guestbook'] = array(
'model_name' => 'guestbookcomments_model',
'model_location' => 'guestbook'
);
We’ve set the model_name key with the name of a model file (which we’ll create shortly) and the model_location key with the name of the new directory. Fuel CMS will now look for the model in modules/guestbook/models. (See Fuel CMS’s user guide for a full list of parameters.)
我們已将model_name密鑰設定為模型檔案的名稱(稍後将建立),并将model_location密鑰設定為新目錄的名稱。 現在,Fuel CMS将在子產品/來賓簿/模型中尋找模型。 (有關完整的參數清單,請參見Fuel CMS的使用者指南。)
Next, create the guestbook table in your database with the following SQL:
接下來,使用以下SQL在資料庫中建立留言簿表:
CREATE TABLE IF NOT EXISTS guestbook_comments (
id INTEGER UNSIGNED NOT NULL AUTO_INCREMENT,
author VARCHAR(25) NULL NULL,
comment VARCHAR(100) NOT NULL,
`date` DATETIME NOT NULL,
visible ENUM('yes', 'no') NOT NULL DEFAULT 'yes',

PRIMARY KEY (id)
);
The purpose of each column should be clear based on the names; the table stores guestbook comments with the comment author’s name, the date, and whether the entry is visible or not (the
visible
column is special to Fuel CMS).
每列的目的應根據名稱明确; 該表存儲的留言簿評論以及評論作者的姓名,日期以及該條目是否可見(
visible
列對于Fuel CMS來說是特殊的)。
Next let’s turn our attention to creating the model class which acts as a kind of translator between PHP and the database. Go to the guestbook folder and create a new directory in it named
models
. Then add the model file in it named
guestbookcomments_model.php
:
接下來,讓我們把注意力轉移到建立模型類上,該類充當PHP和資料庫之間的一種轉換器。 轉到guestbook檔案夾并在其中建立一個名為
models
的新目錄。 然後在其中添加名為
guestbookcomments_model.php
的模型檔案:
<?php
if (!defined('BASEPATH')) exit('No direct script access allowed');
require_once(FUEL_PATH . 'models/base_module_model.php');

class GuestbookComments_model extends Base_module_model
{
public function __construct()
{
parent::__construct('guestbook_comments');
}
}

class GuestbookComment_model extends Base_module_record
{
}
This is just the basis for our module.
GuestbookComments_model
extends the
Base_module_model
class which will handle our listing and administration interactions automatically. The string passed into the parent constructor is the name of the database table this model will use.
GuestbookComment_model
extends
Base_module_record
which handles working with individual records.
這隻是我們子產品的基礎。
GuestbookComments_model
擴充了
Base_module_model
類,該類将自動處理我們的清單和管理互動。 傳遞給父構造函數的字元串是此模型将使用的資料庫表的名稱。
GuestbookComment_model
擴充了處理單個記錄的
Base_module_record
。
If you want you can test it out and see if it works, log in into your dashboard and select ‘Guestbook’ from the Modules submenu. Normally there would be a list of comments, but as we don’t have any data yet the list is empty, so click on the Create button to add one.
如果您希望對其進行測試并檢視其是否有效,請登入到儀表闆,然後從“子產品”子菜單中選擇“來賓”。 通常會有一個注釋清單,但是由于我們沒有任何資料,但該清單為空,是以請單擊“建立”按鈕添加一個。
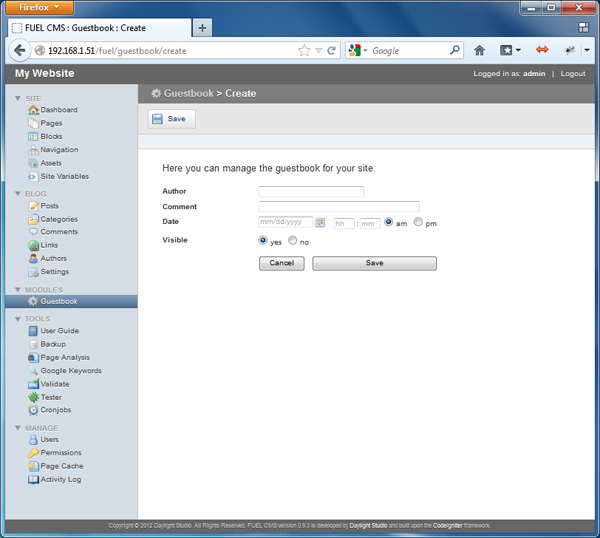
When you return to the list, you should see the comment you just added. As more and more people will leave comments in the guestbook, this is the place where you’ll go to moderate them and keep your guestbook free from spam.
傳回清單時,您應該看到剛剛添加的注釋。 随着越來越多的人在留言簿中留下評論,您将在這裡進行稽核,并使留言簿免受垃圾郵件的侵擾。
建立控制器 (Creating the Controller)
This is all very cool and such, but you obviously don’t want to be the only person able to add comments! We need to create a controller to handle the public-facing actions.
這些都很酷,但是您顯然不想成為唯一可以添加評論的人! 我們需要建立一個控制器來處理面向公衆的行為。
Create the directory
controllers
in the guestbook folder, and then in that create the file
guestbook.php
with the following:
在guestbook檔案夾中建立目錄
controllers
,然後在其中建立檔案
guestbook.php
并添加以下内容:
<?php
class Guestbook extends CI_Controller
{
function view()
{
echo '<h1>Guestbook</h1>';
$this->load->module_model('guestbook', 'GuestbookComments_model');
$comments = $this->GuestbookComments_model->find_all();
foreach ($comments as $comment) {
echo '<h2>' . $comment->author . '</h2>';
echo $comment->comment;
}
}
}
You can access controller actions by using the controller name and then the action name in the URL. So, to see the view, navigate to http://localhost/guestbook/view (or whatever your development address may be) in your browser.
您可以使用控制器名稱,然後使用URL中的動作名稱來通路控制器動作。 是以,要檢視視圖,請在浏覽器中導航到http:// localhost / guestbook / view (或任何開發位址)。
Most of the code used in the controller is CodeIgniter except for the
module_model()
method. The first argument is the name of the modules directory, in our case ‘guestbook’, and the second argument is the name of our model class that extended
Base_module_model
.
除
module_model()
方法外,控制器中使用的大多數代碼都是CodeIgniter。 第一個參數是子產品目錄的名稱,在本例中為“ guestbook”,第二個參數是擴充
Base_module_model
模型類的名稱。
After we’ve registered our module’s model, we use it’s
find_all()
method and we loop through the results to display them. (It’s preferable to use a view instead of having display logic in your controller, but I want to keep things simple for the sake of this article.)
在注冊子產品的模型之後,我們使用它的
find_all()
方法,并循環周遊結果以顯示它們。 (最好是使用視圖而不是在控制器中使用顯示邏輯,但是出于本文的考慮,我想使事情保持簡單。)
A guestbook isn’t really useful without an option to add a new comment, is it? Add a new method to the controller:
沒有添加新評論的選項,留言簿并不是真正有用的,是嗎? 向控制器添加新方法:
<?php
public function add()
{
$this->load->library(
'form_builder',
array(
'id'=>'addComment',
'form_attrs' => array(
'method' => 'post',
'action' => 'newcomment'
),
'submit_value' => 'Add new comment',
'textarea_rows' => '5',
'textarea_cols' => '28'
)
);

$fields = array(
'name' => array(
'label' => 'Full Name',
'required' => true
),
'comment' => array(
'type' => 'text',
'label' => 'Comment',
'required' => true
)
);
$this->form_builder->set_fields($fields);
echo $this->form_builder->render();
}
Now when we go to http://localhost/guestbook/add we should see the form.
現在,當我們轉到http:// localhost / guestbook / add時,我們應該看到表格。
We used Fuel CMS’s form builder to give everything a nice, clean look and avoid writing the HTML ourselves. We first load the form_builder library and then pass it some arguments to define the properties and elements of the form. Check the documentation for a full listing.
我們使用了Fuel CMS的表單生成器為所有内容提供了美觀,幹淨的外觀,并避免了自己編寫HTML。 我們首先加載form_builder庫,然後向其傳遞一些參數以定義表單的屬性和元素。 檢視文檔以擷取完整清單。
The form’s action is ‘newcomment’, so we need to create a new method in the controller to handle the form submission:
表單的動作是“ newcomment”,是以我們需要在控制器中建立一個新方法來處理表單送出:
<?php
public function newcomment()
{
$this->load->module_model('guestbook', 'GuestbookComments_model');
$comment = $this->GuestbookComments_model->create();
$comment->author = $this->input->post('name');
$comment->date = date('Y-m-d G:i:s');
$comment->comment = $this->input->post('comment');
$comment->save();

echo 'comment successfully added';
}
We load the guestbook model, assign the incoming data to its members, and then save it to the database. Finally, a success message is issued that says everything has been added to the database.
我們加載留言簿模型,将傳入的資料配置設定給其成員,然後将其儲存到資料庫。 最後,發出一條成功消息,指出已将所有内容添加到資料庫中。
摘要 (Summary)
As you’ve seen, Fuel CMS doesn’t provide pre-packaged solutions for many things like large CMS platforms do; a lot is left up to you as a developer. But luckily, it’s not hard thanks to the CodeIgniter framework and Fuel CMS’s helper libraries.
如您所見,Fuel CMS并沒有像大型CMS平台那樣為許多事情提供預包裝的解決方案。 作為開發人員,您還有很多事情要做。 但幸運的是,這要歸功于CodeIgniter架構和Fuel CMS的幫助程式庫。
Image via Fotolia
圖檔來自Fotolia
翻譯自: https://www.sitepoint.com/getting-started-with-fuel-cms-2/
fuel
![mybatis_入門程式Mybatis入門[圖]](data:image/gif;base64,R0lGODlhAQABAIAAAP///wAAACwAAAAAAQABAAACAkQBADs=)